SetResolution 0.2.1
dotnet tool install --global SetResolution --version 0.2.1
dotnet new tool-manifest # if you are setting up this repo
dotnet tool install --local SetResolution --version 0.2.1
#tool dotnet:?package=SetResolution&version=0.2.1
nuke :add-package SetResolution --version 0.2.1
SetResolution: Set Windows Display Resolution from the Command Line


![]()
This small command line utility allows you to quickly set Windows Display Resolutions to any of the available display modes available for your active Monitors or virtual display devices.
- Set an explicit Display Resolution
- Create and use Display Mode Profiles for quick access
- List all available Display Modes and Monitors
- Supports multiple Monitors
- Prompts for confirmation by default to avoid invalid display modes
- Runs as standalone, single file Windows EXE
- Can install and run as
dotnet tool<small>(>=v0.2 (.NET 8.0), <v0.2 (.NET 6.0))</small>
Basic Usage
Most common usage is via a pre-defined profile name:
# Set to a profile named 1080 on default monitor
SetResolution 1080

# or shortcut version (sr.exe) on Monitor 2
sr 4k -m2
We ship a few default profiles:
- 4k
- 1080
- 1440
- 720
but you can also edit these or create your own named profiles.
Alternately you can explicitly pick a resolution, frequency, bit rate and Orientation:
sr SET -w 2560 -h 1600 -f 60 -b 32 -o 0
Frequency, BitRate and Orientation are optional
To see available resolutions for a specific monitor:
# default list is filtered to current frequency/bitrate/orientation
# and the `MinResolutionWidth` configuration setting
sr LIST -m1

# list ALL resolutions/modes
sr LIST -m1 -la
To create a new profile:
# Create a new profile
sr CREATEPROFILE -w 2560 -h 1600 -f 60 -b 32 -o 0

# List all profiles with their settings
sr PROFILES
Installation
You can install this tool in a couple of ways (for now).
Download Single-File EXE Binary
This tool is a small, self-contained Console EXE application. For now, you can download the SetResolution.exe (or sr.exe file directly from here):
I recommend you copy to a folder location that is in your Windows path or add it to your path, so you can run SetResolution from any location.
Install as Dotnet Tool (.NET 6.0 SDK required)
For .NET developers the easiest way to install and keep the tool up to date is via Dotnet Tool installation. This requires that the .NET 6.0 (or later) SDK.
You can install, update and use it with:
# install
dotnet tool install -g SetResolution

# Use it
SetResolution 1080 -m2

#update
dotnet tool update -g SetResolution
Full Syntax
To show available syntax, run SetResolution.exe or sr.exe without any parameters or /? or HELP.
The help information is as follows:
Multi-Monitor Support
This tool supports multiple monitors via the -m <MonitorNumber> command line switch. By default the Main Windows Monitor monitor is used which corresponds to the Main Monitor setting configured in the Windows Display settings.
Both the SET, PROFILE and LIST commands support the -m switch to specify the monitor that the command applies to. Creating a new profile does not specify a monitor.
The -m switch uses a numbering scheme from 1-n, with monitor numbers identified in the LIST command. The numbers also reflect the same value you see in the Windows Display Settings dialog.
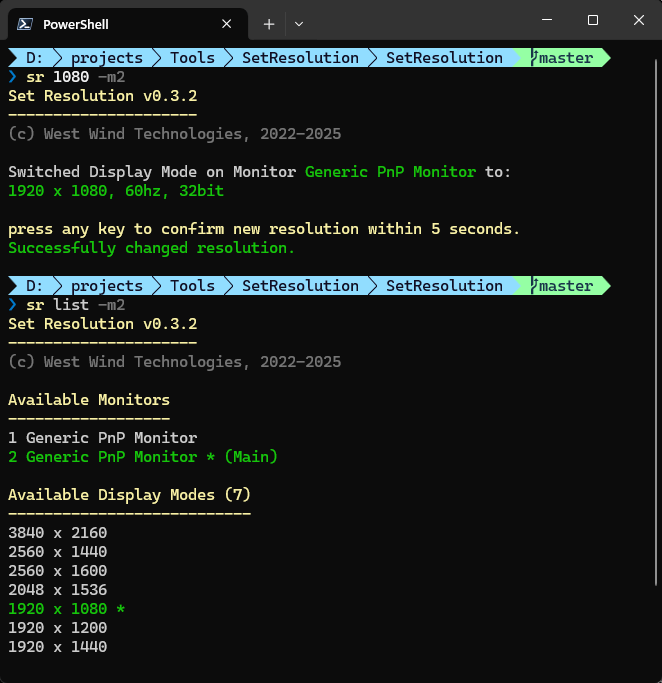
List Available Monitors and Display Modes
You can use the LIST command to show available Monitors and Display Modes as well as the currently selected monitor and display mode. The display modes available are specific for the Monitor/Video Driver combination that is active.
If you don't specify the -m switch which selects a monitor, the Windows Main Monitor is used. The list of Display Modes is always specific to the selected monitor. You can explicitly select a monitor via the -m switch.
The selected monitor and display mode are highlighted in the list (green and *).
sr LIST -m1
This shows a list of display modes available. By default the list only shows:
- Sizes with the Width > 800 pixels
- Frequencies that match the current display frequency
- Orientation that match the current orientation
This list is similar to the list you see in the Windows Display Resolution drop down list.
If you want to see all display modes available for your monitor/video driver combination use the -la command line switch:
sr LIST -m1 -la
The list displays the selected monitor and display mode for this command in green and with the * at the end.
This displays all displays modes for all sizes, orientations and frequencies. This list tends to very large with many duplicate and overlapping values. However it can be useful to match an exact display mode.
Use these display modes when you create new Profiles and ensure your Profile matches the Display Modes that are supported.
Profiles
Profiles are 'shortcuts' to a specific set of saved Display Settings with a name that you can access simply by specifying the profile name:
sr <profileName> -m1
Profiles are the preferred way to switch resolutions as they give you quick access via a single profile name string, instead of having to specify all the settings individually. The -m1 switch specifies the monitor to apply to - if not specified the Main Windows Monitor is used.
A Profile stores the following values:
- Height and Width
- Monitor Frequency (60)
- Color Bit Size (32)
- Orientation (0)
<small>values in parenthesis are optional default values if not specified</small>
Profiles do not store Monitor numbers
If you need to apply to a specific monitor make sure you add the
-mswitch to explicit specify the specific monitor you want to apply the profile to.
Create a new Profile
You can create a profile with:
SetResolution CREATEPROFILE -p <profileName> -w 1280 -h 768 -f 59
Manually Edit SetResolution.xml
Profiles are stored in SetResolution.xml in the same folder as the .exe, so you can manually edit the XML file to add or edit profiles. In order to remove profiles you have to edit the SetResolution.xml file and remove the entry.
<?xml version="1.0" encoding="utf-8"?>
<SetResolution xmlns:xsd="http://www.w3.org/2001/XMLSchema" xmlns:xsi="http://www.w3.org/2001/XMLSchema-instance">
   <Profiles>
      <DisplayProfile>
         <Name>1080</Name>
         <Width>1920</Width>
         <Height>1080</Height>
         <Frequency>60</Frequency>
         <BitSize>32</BitSize>
         <Orientation>Default</Orientation>
      </DisplayProfile>
      <DisplayProfile>
         <Name>4k</Name>
         <Width>3840</Width>
         <Height>2160</Height>
         <Frequency>60</Frequency>
         <BitSize>32</BitSize>
         <Orientation>Default</Orientation>
      </DisplayProfile>
      <DisplayProfile>
         <Name>1440</Name>
         <Width>2560</Width>
         <Height>1440</Height>
         <Frequency>60</Frequency>
         <BitSize>32</BitSize>
         <Orientation>Default</Orientation>
      </DisplayProfile>
      <DisplayProfile>
         <Name>720</Name>
         <Width>1280</Width>
         <Height>720</Height>
         <Frequency>60</Frequency>
         <BitSize>32</BitSize>
         <Orientation>Default</Orientation>
      </DisplayProfile>
   </Profiles>
   <MinResolution>1280</MinResolution>
</SetResolution>
XML? Really?
Yeah I know XML - but to keep the EXE as a fully self-contained, single EXE file and avoid external dependencies, XML serialization is used since it's built into the core framework runtime.
Write Permissions required for Profile File
In order to save a new profile using
CREATEPROFILEyou have to have Write Permissions in the same folderSetResolution.exeorsr.exe. This means that preferrably you'll install this tool into a location that supports writing files.Alternately you can manually edit the file, or give the file itself full read/write access.
Setting a Profile
Once a profile has been created you can invoke it.
# Shortcut way - on monitor 2
SetResolution <profileName> -m2

# Full syntax - on main monitor (not specified)
SetResolution SET -p <profileName> -m1
Default Profiles
A number of default profiles are added for common 16:9 resolutions @ 60hz which is most common:
Available Profiles
------------------
1080:  1920 x 1080, 32, 60
4k:  3840 x 2160, 32, 60
1440:  2560 x 1440, 32, 60
720:  1280 x 720, 32, 60
These are loaded on first load of the application and stored in the saved profile file (if writable).
Profiles File Location: SetResolution.xml
Profiles are stored on disk in SetResolution.xml in the same folder as the .exe and you can add and remove additional profiles there or add via the CREATEPROFILE action as described above.
Note: If you installed the EXE in a location that has no write access, saving of new Profile entries with
CREATEPROFILEwill fail silently. Either giveSetResolution.xmlread/write access or move the application to a location where you are allowed to write files.
Fark: I set a Resolution that doesn't work. Now what?
While it's really, really difficult to do this, if you somehow managed to accidentally set your monitor into a display mode that isn't supported or just doesn't work with your monitor, it's possible that your screen becomes inaccessible. Because this tool switches the default display settings, once a wrong setting is made the screen simply will be blank and it's not just a simple matter of rebooting as the setting is applied to the Windows settings and persists on a reboot.
To reset a non-working display setting you have to boot into Windows Safe Mode and select another display mode, then reboot.
As mentioned it should be really difficult to get the monitor/driver into a non-working state because we:
Check settings for valid display resolutions
You can't set a resolution that is not supported by the driver/monitor combo at the time of setting the mode. The only way you can get an invalid resolution is if the driver supports a mode, but for some reason the monitor does not. The list SetResolution retrieves for display modes is filtered by Windows to match driver/monitor combos that are expected to work.Prompt for Confirmation of Mode Change
We prompt for confirmation after the resolution change and if you don't confirm in 5 seconds the display reverts to the previous mode. This ensures if your screen for some reason goes blank, you will revert back to your last working configuration. While I'm not a fan of confirmation prompts, in this case it's both prudent, and only slightly intrusive as you can simply press a key after submitting the shell command. If it really bugs you you can also run with-nopromptwhich skips the prompt (not recommended though).
Credits
The initial code that manages retrieving and setting display modes is based on this excellent article on C# Corner by Mohammad Elseheimy:
This derivative tool adds an easy to use Console front-end and provides for multi-monitor support. Most of the credit for this tool goes to Mohammad's work!
To do
nothing
| Product | Versions Compatible and additional computed target framework versions. |
|---|---|
| .NET | net8.0 is compatible. net8.0-android was computed. net8.0-browser was computed. net8.0-ios was computed. net8.0-maccatalyst was computed. net8.0-macos was computed. net8.0-tvos was computed. net8.0-windows was computed. |
This package has no dependencies.