Pixie 0.2.1
dotnet add package Pixie --version 0.2.1
NuGet\Install-Package Pixie -Version 0.2.1
<PackageReference Include="Pixie" Version="0.2.1" />
<PackageVersion Include="Pixie" Version="0.2.1" />
<PackageReference Include="Pixie" />
paket add Pixie --version 0.2.1
#r "nuget: Pixie, 0.2.1"
#:package Pixie@0.2.1
#addin nuget:?package=Pixie&version=0.2.1
#tool nuget:?package=Pixie&version=0.2.1
Pixie


Pixie is a C# library for building polished command-line applications. It gives you a high-level API for terminal output, diagnostics, help text, and GNU-style option parsing, then renders the best output your terminal can support.
Pixie is a good fit when you want to:
- print structured, readable console output instead of hand-formatting strings,
- show rich diagnostics with source context and caret highlights,
- generate help output from the same option definitions you parse, and
- keep CLI output readable across terminals with different Unicode and styling support.
Quick start
Install Pixie:
dotnet add package Pixie
Then write and log a message:
using Pixie;
using Pixie.Terminal;

var log = TerminalLog.Acquire();

log.Info("Hello from Pixie.");
TerminalLog.Acquire() is the usual entry point for diagnostics and other CLI feedback. It writes to standard error by default, which is often what you want for warnings, errors, and help output.
If you want to write normal program output to standard output instead, use:
using Pixie.Terminal;

var log = TerminalLog.AcquireStandardOutput();
In most applications, you should acquire a log once and reuse it.
Packages
Pixie ships as a single NuGet package:
| Package | Includes |
|---|---|
Pixie |
Core APIs for logging, markup, diagnostics, option parsing, and terminal output (including Pixie.Terminal). |
You normally only need to install Pixie. The Pixie.Terminal assembly is included in that package and does not need to be installed separately.
Choose the right starting point
Use this as a quick decision guide:
| If you want to... | Start with... |
|---|---|
| Write regular terminal output with wrapping and layout | TerminalLog.AcquireStandardOutput() |
| Write diagnostics, warnings, or help text | TerminalLog.Acquire() |
| Write compiler-style diagnostics with headers | log.ErrorDiagnostic(...) or Diagnostic.FromSeverity(...) |
| Parse GNU-style options and read typed values back | CommandLine + OptionParseResult |
Generate --help output from option definitions |
CommandLine.WithHelp(...) or HelpMessage |
| Control styling, encoding, or terminal capabilities manually | TextWriterTerminal + TerminalLog.Acquire(...) |
For a fuller walkthrough, see docs/getting-started.md.
What Pixie can do
Caret diagnostics
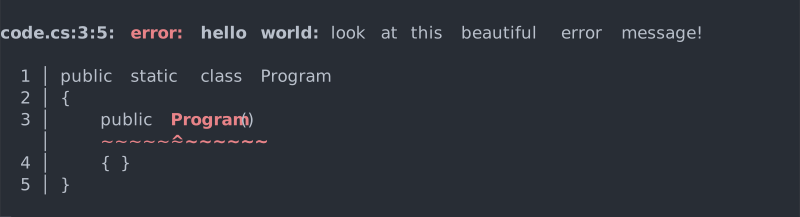
Pixie has built-in support for compiler-style diagnostics. In Pixie, a diagnostic is a message with:
- an origin, such as a file location or application name,
- a kind, such as
errororwarning, - a short title, and
- an optional body with extra context, such as highlighted source code.
That means Pixie can render both the diagnostic header, like code.cs:3:5: error: expected token, and the caret-highlighted snippet underneath it.
Argument parsing with feedback
Pixie can parse GNU-style command-line options and report mistakes in a user-friendly way, including usage guidance and option name suggestions.

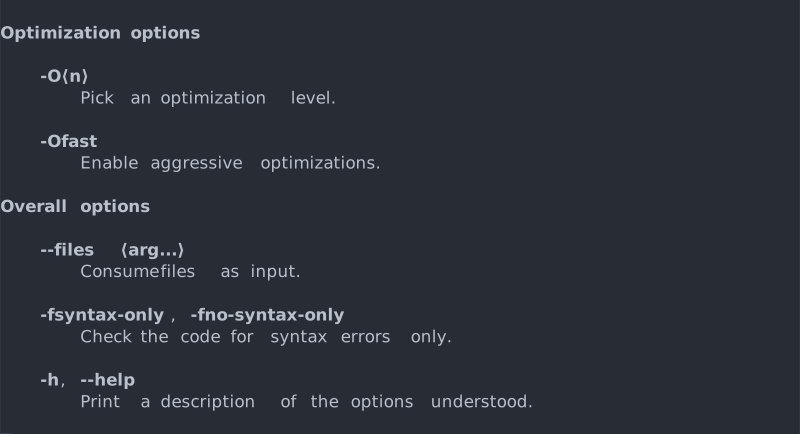
Help messages
Pixie can generate help output from the same option definitions you use for parsing, so parsing and documentation stay in sync.
Graceful terminal degradation
Pixie tries to produce the nicest output your terminal can handle. When Unicode characters or ANSI styling are unavailable, it falls back to simpler representations instead of breaking formatting.
Unicode-rich rendering:

Simpler fallback rendering:

Readable layout
Pixie supports alignment, wrapping, and reusable markup nodes for common CLI output patterns.
Without careful layout, terminal messages can become awkward:

With Pixie, the same message can be wrapped and structured more cleanly:

Getting started
1. Acquire a log
Pixie's main output abstraction is ILog. Logs accept LogEntry values, which are self-contained messages with a severity and a markup tree.
For terminal applications, TerminalLog.Acquire() is the usual choice when you want output on standard error:
using Pixie.Terminal;

var log = TerminalLog.Acquire();
If you want standard output instead, use TerminalLog.AcquireStandardOutput().
2. Log a message
Plain strings can be used directly as markup, so the smallest useful example is:
using Pixie;
using Pixie.Terminal;

var log = TerminalLog.Acquire();

log.Error("Something went wrong.");
If you need full control, log.Log(new LogEntry(...)) is still available. For explicit markup nodes, use types from Pixie.Markup, such as Text, Sequence, BulletedList, or HighlightedSource.
3. Parse command-line arguments
Pixie includes GNU-style option parsing. You define options once, then parse arguments and read back typed values.
using System.Collections.Generic;
using Pixie;
using Pixie.Options;
using Pixie.Terminal;

var log = TerminalLog.Acquire();

var helpFlag = Option.Flag("-h", "--help");
var filesOption = Option.StringSequence("--files")
    .WithParameter("file");

var commandLine = new CommandLine(
    new Option[] { helpFlag },
    filesOption);

var parsedArgs = commandLine.Parse(new[] { "input.cs", "-h" }, log);

bool showHelp = parsedArgs.GetValue(helpFlag);
IReadOnlyList<string> files = parsedArgs.GetValue(filesOption);

if (!parsedArgs.IsSuccess)
{
    return;
}
If you want the common --help and --version flow handled for you:
var commandLine = new CommandLine(filesOption)
    .WithHelp("Example program.", "example [files-or-options]")
    .WithVersion("example 1.0.0");

var result = commandLine.Parse(args, log);
if (result.WasHandled)
{
    return;
}
For custom typed parsing, use the generic builders:
var portOption = Option.Value(
    (OptionForm form, string argument, ILog log) => int.Parse(argument),
    8080,
    "--port")
    .WithParameter("n");
When parsing fails, Pixie can report errors to the log and also capture them in the returned OptionParseResult. The same result can also tell you whether built-in help or version handling already printed output via WasHandled. In other words, WasHandled is for parser-managed early exits like help/version, not for parse failures.
Parse(...) returns an OptionParseResult, so applications can inspect typed values, see whether parsing succeeded, and decide what to do next. A common pattern is to stop when parsing failed or when Pixie already handled a built-in early-exit flow:
using Pixie;
using Pixie.Options;
using Pixie.Terminal;

var log = TerminalLog.Acquire();

var commandLine = new CommandLine(new Option[] { helpFlag }, filesOption);
var parsedArgs = commandLine.Parse(args, log);

if (!parsedArgs.IsSuccess || parsedArgs.WasHandled)
{
    return parsedArgs.ExitCode;
}
If you prefer exceptions in tests or strict tooling, TestLog can turn selected severities into failures.
4. Document options and generate help
Options can carry categories, descriptions, and parameter metadata. That same information can then be used to generate help output.
using Pixie.Markup;
using Pixie.Options;

var xOption = SequenceOption.CreateStringOption(OptionForm.Short("x"))
    .WithCategory("Input and output")
    .WithDescription(
        "Specify explicitly the language for the following input files.")
    .WithParameters(
        new SymbolicOptionParameter("language"),
        new SymbolicOptionParameter("file", true));

var help = new HelpMessage(
    "An example application built with Pixie.",
    "example [files-or-options]",
    new Option[] { xOption });
To see a more complete example, check Examples/PrintHelp/Program.cs.
5. Render rich diagnostics
Pixie's diagnostic model is especially useful when you already know the source span you want to highlight.
There are two layers here:
HighlightedSourcerenders a code snippet with line numbers and caret/squiggle markers.Diagnosticrenders a full diagnostic header likecode.cs:3:5: error: Expected constructor name.
In practice, most applications want both, so create the highlighted snippet and log it through one of the diagnostic helpers.
using Pixie;
using Pixie.Code;
using Pixie.Markup;
using Pixie.Terminal;

var log = TerminalLog.Acquire();

const string source = "public static class Program\n{\n    public Program()\n    { }\n}";
var document = new StringDocument("code.cs", source);
var nameOffset = source.IndexOf("Program()");

var focusRegion = new SourceRegion(
    new SourceSpan(document, nameOffset, "Program".Length));
var highlightedSource = new HighlightedSource(focusRegion, focusRegion);

log.ErrorDiagnostic(
    new SourceReference(highlightedSource.HighlightedSpan),
    "Expected constructor name",
    highlightedSource);
The diagnostic origin controls the filename and line/column information in the header. SourceReference is the common origin for caret diagnostics because it can resolve a highlighted source span back to the original document location.
If you log a raw LogEntry with new HighlightedSource(...), Pixie will still render the snippet and caret, but it will not render the code.cs:line:column: error: ... header. This keeps diagnostic output explicit, so the same application can freely mix diagnostics, help text, progress messages, and other non-diagnostic output.
For a fuller version with transforms and custom renderer configuration, see Examples/CaretDiagnostics/Program.cs.
Package notes
Pixie is enough for most applications. It includes the core APIs plus the Pixie.Terminal assembly, so you can use TerminalLog, terminal renderers, and terminal device helpers after installing the main package.
Examples
The repository includes small example programs you can run directly:
dotnet run --project Examples/PrintHelp/PrintHelp.csproj
dotnet run --project Examples/ParseOptions/ParseOptions.csproj -- --helo file.cs
dotnet run --project Examples/CaretDiagnostics/CaretDiagnostics.csproj
Available examples:
| Example | What it demonstrates |
|---|---|
Examples/SimpleErrorMessage |
A minimal diagnostic-style message. |
Examples/FormattedList |
Titles, colors, wrapping, bullets, and manual terminal configuration. |
Examples/PrintHelp |
Building help output from option definitions. |
Examples/ParseOptions |
GNU-style parsing, typed values, suggestions, and diagnostic feedback. |
Examples/CaretDiagnostics |
Source snippets, focus regions, and compiler-style diagnostic headers. |
For a more guided tour, see docs/examples.md.
Building and testing
Build the solution:
dotnet build Pixie.slnx
Run the test suite:
dotnet test Tests/Tests.csproj
Repository layout
| Path | Contents |
|---|---|
Pixie/ |
Core library: logs, markup nodes, diagnostics, options, and transforms. |
Pixie.Terminal/ |
Terminal rendering and device-specific behavior. |
Examples/ |
Small runnable sample applications. |
Tests/ |
NUnit test suite. |
docs/img/ |
SVG assets used in this README. |
Customization
Pixie is designed to be extensible. You can:
- compose markup trees from reusable node types,
- configure or replace renderers,
- wrap logs in transforms, and
- define your own markup elements and rendering behavior.
The examples in Examples/CaretDiagnostics/Program.cs and Examples/ParseOptions/Program.cs show some of that flexibility in practice.
Contributing
Issues, questions, and pull requests are all welcome.
If you want to contribute code:
- Open an issue first for larger changes so the direction is clear.
- Build the solution with
dotnet build Pixie.slnx. - Run tests with
dotnet test Tests/Tests.csproj.
Bug reports and usage questions are also welcome in the issue tracker.
| Product | Versions Compatible and additional computed target framework versions. |
|---|---|
| .NET | net5.0 was computed. net5.0-windows was computed. net6.0 was computed. net6.0-android was computed. net6.0-ios was computed. net6.0-maccatalyst was computed. net6.0-macos was computed. net6.0-tvos was computed. net6.0-windows was computed. net7.0 was computed. net7.0-android was computed. net7.0-ios was computed. net7.0-maccatalyst was computed. net7.0-macos was computed. net7.0-tvos was computed. net7.0-windows was computed. net8.0 was computed. net8.0-android was computed. net8.0-browser was computed. net8.0-ios was computed. net8.0-maccatalyst was computed. net8.0-macos was computed. net8.0-tvos was computed. net8.0-windows was computed. net9.0 was computed. net9.0-android was computed. net9.0-browser was computed. net9.0-ios was computed. net9.0-maccatalyst was computed. net9.0-macos was computed. net9.0-tvos was computed. net9.0-windows was computed. net10.0 is compatible. net10.0-android was computed. net10.0-browser was computed. net10.0-ios was computed. net10.0-maccatalyst was computed. net10.0-macos was computed. net10.0-tvos was computed. net10.0-windows was computed. |
| .NET Core | netcoreapp2.0 was computed. netcoreapp2.1 was computed. netcoreapp2.2 was computed. netcoreapp3.0 was computed. netcoreapp3.1 was computed. |
| .NET Standard | netstandard2.0 is compatible. netstandard2.1 was computed. |
| .NET Framework | net461 was computed. net462 was computed. net463 was computed. net47 was computed. net471 was computed. net472 was computed. net48 was computed. net481 was computed. |
| MonoAndroid | monoandroid was computed. |
| MonoMac | monomac was computed. |
| MonoTouch | monotouch was computed. |
| Tizen | tizen40 was computed. tizen60 was computed. |
| Xamarin.iOS | xamarinios was computed. |
| Xamarin.Mac | xamarinmac was computed. |
| Xamarin.TVOS | xamarintvos was computed. |
| Xamarin.WatchOS | xamarinwatchos was computed. |
-
.NETStandard 2.0
- No dependencies.
-
net10.0
- No dependencies.
NuGet packages (2)
Showing the top 2 NuGet packages that depend on Pixie:
| Package | Downloads |
|---|---|
|
Pixie.Loyc
Pixie is a C# library that prints beautifully formatted output to the console. This package contains Pixie.Loyc, a library that translates Loyc diagnostics to Pixie markup nodes. |
|
|
Wasm.Text
Wasm.Text is a library that can assemble WebAssembly text format files and scripts. It is based on cs-wasm, a C# library that can read, write, interpret and optimize WebAssembly files. |
GitHub repositories
This package is not used by any popular GitHub repositories.
| Version | Downloads | Last Updated |
|---|---|---|
| 0.2.1 | 208 | 5/1/2026 |
| 0.1.12 | 402 | 3/27/2026 |
| 0.1.11 | 169 | 3/27/2026 |
| 0.1.10 | 172 | 3/27/2026 |
| 0.1.9 | 4,536 | 7/2/2019 |
| 0.1.8 | 1,115 | 6/8/2019 |
| 0.1.7 | 1,287 | 6/5/2019 |
| 0.1.6 | 1,151 | 6/3/2019 |
| 0.1.5 | 2,929 | 5/5/2018 |
| 0.1.4 | 2,101 | 4/13/2018 |
| 0.1.3 | 1,783 | 4/12/2018 |
| 0.1.2 | 1,597 | 4/11/2018 |
| 0.1.1 | 1,458 | 12/1/2017 |